Showing posts with label robot. Show all posts

Wednesday, December 27, 2023

HUXLEY® LEGENDARY ART

 "HUXLEY® is a post apocalyptic story about two scavengers who find an ancient robot and get swept up on an adventure that could change the fate of the galaxy as they know it."

www.huxleysaga.com

Excited to showcase the release of the HUXLEY Legendary Art collection! Was awesome working with the amazing Nikolas Gekko on these illustrations to bring the Huxley characters to life in the universe. You can see more of Nikolas's work here: https://www.artstation.com/nicolasgekko

Original 2008-2014 designs/artwork for the project can be found here:
https://benmaurodesign.com/Huxley


Monday, November 25, 2019

HUXLEY™ PART 1

Happy to finally start talking about this! The reason I've been so quiet the last 3+ years on the personal work side of things is because i have been putting all my free time into writing and illustrating my first original graphic novel called HUXLEY™, its at a point where i can start sharing/talking about it as im getting close to finishing the entire book.

The original Huxley™ robot character was created and designed back in 2014 with a story i had in mind, around 2016 i started to actively produce page 1 and commit to making this thing in-between client work. Has been a long road, and a lot of these early pages are 3+ years old now but im excited to start putting this out there and share this new story universe with the world.

https://www.artstation.com/artwork/qAz6oa
https://benmaurodesign.com/HUXLEY-GRAPHIC-NOVEL


Sunday, July 20, 2014

OPAL - CDA Workshop

One of the designs developed for the Concept Design Academy workshop this past weekend, started with photo/sketch exploration and this was a zbrush blockout/paintover to resolve the design and take it to a slightly higher fidelity as some of the stuff covered on day 1 before refining further.

The idea is that the smaller arms can clip/lock into the main arms while in motion or while in transit on another vehicle. The larger arms/legs are for locomotion and manipulation, each finger is a retractable tentacle type manipulator that come out when needed for more delicate interaction with its environment or for attacking. The smaller arms are for manipulation and have an ammo feed inside so the design can hold another weapon with its fingers or fire directly out of its hands to engage targets in multiple directions at once. The arms are all very flexible like an octopus or something so it could move and traverse areas where a human cannot, the more hard surfaced parts at the top of each limb contain ammo/battery/brain of the thing so even if the main 'head' area gets damage or an arm gets blown off they can operate independently to finish their task. Will post some of the closeup's/refinements we did of some of this soon. 


 Couple versions of the early sketch and the initial 3D refinement done for this design over the weekend at the CDA workshop. Still feel like its much easier to control and design graphic shapes in 2D much easier, something always gets lost in translation for me, but its just knowing the strengths and weaknesses of each workflow and using them to get the best result for the job.

Friday, August 23, 2013

Gorilla Tank

In-Class demo from this week. Painting up the final 'gorilla robot' in a clean version more like a Bradley tank also did a quick digital camo variant but maybe i will post that later. Probably a bit overkill from an illustration/focal point standpoint but the main purpose is just to showcase the model/design in an environment.... will get to some more fun illustrated stuff soon.

You can view the development and work in progress on the model for this in my ZBC sketchbook:
http://www.zbrushcentral.com/showthread.php?149695-Ben-Mauro-Sketchbook/page11
In class demo from this week. Most of the demo's so far have been showing how to use ZBrush to create detailed finished art over a slightly longer period of time but this week i just wanted to demonstrate how we can quickly block out some basic forms/design then do a paintover using photos/painting to get a finished production illustration in a few hours.
 
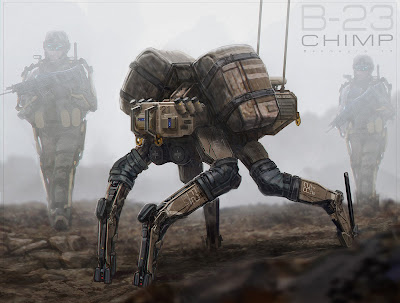
So here was that really blurry guy way in the background on the first illustration next to the soldier fleshed out a little more, some sort of smaller carryall type bot..... i call him the CHIMP. Might go and do a more refined 3D/Keyshot version of this guy after i refined the design more in ZBrush working everything out to the same level as the Gorilla or higher. We'll see how everything works out over the next few weeks.
A robot sketch i did earlier this year during Khang Le's demo in AUS, not related to the more realistic gorrila tank robot i did in class but thought i would share instead of letting it collect dust on my HD.

Thursday, May 30, 2013

Warmups

Some more warmups and things, sort of a realistic take on a slightly future MGS/Eva/GIS/Appleseed inspired humanoid SWAT robotic soldier for the military, i imagine it would be completely autonomous and/or have some soldiers mind downloaded into this vessel so a team of these guys could be extra lethal with years of combat training augmented by a superior body. Haven't put my designs in environments in a while...a bit rusty to be honest. Mostly 3D with some refinement in Photoshop on the transition areas between the artificial muscles and the robotic areas. Pushing myself to build more detailed/refined hard surfaced stuff in 3D this year after seeing what guys like Vitaly/Furio/Fausto/Gavril/Fields have been smashing out lately...definitely takes a while to get into but seems to be speeding up. Should have much more to share later this year.


Some little teaser images i did testing out Keyshot before going in and detailing the model more (you can see how rough the model is in these images). 


Spent a little more time on the model based on where the paintover went and did some more finished renderings out of keyshot, this is mostly straight out of the program with a little PS work on the decals etc (though you can do that in the program). Could have taken things further, but that's all the time i had to spend on it this week (and probably all the time i will have for a while). Mostly a technical exercise getting some new processes for building complicated hard surfaced designs and rendering pipelines down for class next term, took a bit more time than i would have liked messing around with each program and figuring out how to get both to work together efficiently (on a laptop!), but i think for future designs it will be a really effective combination to create some highly detailed renderings very rapidly, when you see your design looking photoreal in real-time in the keyshot viewport.....its very addicting.
 Grey renders of the model, still not super detailed but fairly resolved for a concept, would definitely like to push the level of detail much further on future designs. 
 Polygroups on the model before exporting to Keyshot. I am doing everything on my macbook pro so i needed to use decimation master a lot to get the polycount down as much as possible, though i ended up building parts of the lower legs separately then merging them (and not dynameshing into one mesh, i think because i was only planning on doing the upper torso so it was detailed ahead of time then decided to do the full body last minute) so the parts of the body are a bit more dense than i would have liked but i just didn't plan ahead as well as i should have and time had run out so i just had to deal with it. A note to myself for future work when doing this sort of thing.